AUTOCAD (01.08.2014-01.09.2014):

In the beginning of an autocad course , I learned the basic comments such as the comment LİNE. It helps us to draw
lines. İf you want you can click the dimension you want.İn the inside of the
line comment, there is other comments such as undo and close. Undo helps us to
forward one comment and close helps us to close the closed area.Also we learned
the menu at the bottom of an autocad page.Orho mode helps us to draw perpendecular
lines.Object snap helps us to put the geometrical points of our shapes. Such as
the end of lines or the mid of the shapes… In the object snap setting there is
extension. Extension helps us to find the right distance without clicling, and
drawing a line.It is used in the comment line.Dynamic input helps us to move
the comment tool inside of the Mouse icon.We learned the other basic comments
such as move,copy,array,offset and trim. I learned something different from
rhino about the command trim. When we clicked the comment trim and without
choosing the knifes, say enter. After saying that everything in the page became
knife and you can delete whatever you want.We draw this machine piece also with
using the basic comments in autocad.

We also learned how to take dimension in autocad.The
comment linear helps us to take dimensions.On the other hand in the basic
comment lists annotate there is continue. The comment continue helps us to take
dimensions side by side. İt is the easiest way to take dimensions.To make CTRL
1 in the computer is very important in using autocade because it helps us to
show the properties of an object or text. You can change the size or the
colour.The comment match properties helps us to move the proporties of an
object to another.Shift and right click helps us to open a property such as
tangent just for that time.

We can also draw lines in a Formula. Such as after
clicking the line comment, if I write 90<270 , 90 shows the distance and 270
show the angle of the line.Array also helps us to array the objects.In the
autocad array menu is very powerful.It has lot of settings such as you can
change the direction, you can change the spacing,with rowse you can make twice
from each of them.The comment stretch helps us to stretched objects , increase
their lenghts without changing the object, or without deleting.We have to make
our choices in stretch with green selecting tool.We can use this comment in
architecture for making bed, Window,door…İf you write the comment tool LTS, it
helps us to change all the line weights at the same time.

We also draw this machine pieces with using the layers.We
can arrange the colours and pieces with the comment layer.From the layer
properties , we can find the layers in autocad.Right click, hide objects helps
us to hide objects, but it isn’t about layers.On the other hand for taking the
hide objects back, we have to make right click,isolation,isolation end object.
In the quick select tool, we can choose lines with looking their layers or
materials.
In the comment scale,there is a inside comment
references.In the references, you write the old lenght, and then write the new
one you want it to be.We learned the comments champer and fillet. Fillet
softens the edges in rectangles with giving radius. Champer break the corners,
shorten the lines in rectangles. Lenghten changes the lenght of objects and the
included angle of arcs.We have an block menu in autocad. With the comment write
block we can save our block to outside of a window. In that way we can open it
whanever we want with the comment insert.Create block creates block from
selected objects.
We can
easily find the autocad library with writing ADC in the comment line. There is
lots of ready blocks for us.

The comment area helps us to calculate the areas of
places.For the soften edges we have to open neares in osnap for obtaining more
precious area.Or we can make groups and say object in the area, then quickly
select the whole object in the same time.You can open the area you calculated
with F3 and copied it to a text box.Hatch helps us to hatch inside of
objects.We can change all of the settings about hatch in hatch menu. We can changed
the hatch pattern scale or angle.Group
manager display groups and put them in a order. You can give names to your
groupes, you can add or remove things. In that way it will changed all of the
other places.You can delete your group with explode.

In autocad you can
save your own style. İf you change the text properties, and make an text style
called your name, if you change the osnap settings or other things like
that say save as and save the format as
an dwt and give your name. In that way when you open a new page, you can select
your name and your style.

The comment align helps us to aligning objects to
another.Break at point break the lines from the point we want.After saying
join, the line come back earlier shape.We can change the dot style from format
dot style. We can make it bigger, or change the icon.Divide helps us to divide
lines equally.For clicking the dots , we have to open node from snap.In the
comment polyline, we can change width.İn the bottom menu, there is infer
constraints. It put an property like ortho, then if you want to move it or
change it the ortho mode never change.

In the basic top menu, in parametric there is
dimensional.You can measure the dimension of your line and with double click
you can change the measure.In the modify menu, with using copy nested object,
you can copy some pieces from blocked objects.

In the annotate menu there is leader. You can add lots of
different type of leader in autocad. From the bottom you can change the
settings.Add leader give both of them the same number.Remove leader remove
that.Align align all of the leaders.Collect for example write 6,7 to both of
them.From the annotate menu, table we can make Excel files in autocad.İf we
want to put an Excel file from our window we have to say insert then data ole
objects and select the Excel file you want.

We can also make isometric drawing in autocad but first
we have to open the isometric snap from osnap setting then we have to choose
snap and grid.We can go from one face to another with F5 for example in cube.In
the dimension menu bar there is oblique. Oblique helps us to select the angle
of the dimension.You can select in which
paralel you want to put your dimensions in isometric drawing.

In the linear dimension if we enter without selecting
anything,it find the line itself.In the annotation, jogged is used for showing
the arcs.Ordinate gives cordinates, but first we have to put it to 0,0.


We also learned 3D in autocad.We have to choose
3D modeling from the top menu for obtaining the 3D comments.For 3D we also have
to maket he top SW isometric.We learned extrude.Also we have to changed 2D
wireframe to shaded with edges for seeing our objects as a solid.We learned
that closed areas became solid after extruding but objects that is not a group
became just an extrude without solid. The inside became empty.The comment
region make the closed area to an surface in 2D.Polysolid is used for drawing
walls in autocad.For that with height we have to give the height of our wall
and with wild we have to give wild. In
that way we can easily draw walls.For taking measurements in 3D we have to open
dynamic input and write Dİ to a comment line.


Prespull also a very important comment in autocad.It is
kind of extrude but prespull can understand the open and closed areas.You can
open a hole in a cube with the comment prespull.İf we want to draw an surface ,
window to a cube first we have to organize the coordinates. For that reason the
comment 3 point is very useful in that. First you choose the orgin then x and
y. By that you can organize the drawings you make in 3D model. On the other
hand there is face in the coordinates. It helps us to take the coordinate whatever
face we want to put in a cube or in our 3D model. Gizmo also very important
comment in 3D.For example in move gizmo, you move the objects looking to the
gizmo circles. This circles helps us to choose our direction.

On the
other hand prespull makes objects one object but extrude maket hem two when we
made a cylinder top of a cube.In the extrude comment there is path. İf we have
an road and we want to extrude it along this road we have to use this
comment.Also in extrude comment in direction we can give the direction to
extrude.
For
giving the solid thickness we can used the comment thicken. It maked the
comment offset in 3D.We can easily give thickness to our solid.We learned the
comments sweep,revolve and loft that is same in the rhino.In the solid tool in
solid editing there is slice comment. İf we make a 3D model and we want to cut
it from a point and see the inside of it this comment helps us to slice it.The
comment extract edge obtains lines from a solid. It takes just the lines.Shell
also give thickness but without closing the top of the solid.Move face move the
holes.Taper face make yokuş in solids.Extrude face increase the height of an
object as a whole.Offset face also offset the faces but it is different from
extrude face because you can change the radius of a hole.


From the top menu bar in sketch up we can use pan and zoom.
With the command field of view we can make perspective way zoom.In zoom window
you make a rectangle showing where you want to zoom then it happens.İn the view
menu in face style you can change the wireframes.İn the camera tool bar we can
arrange the views like top,front and right. İnstead of perspective we can
choose paralel projection, and see the views better.

We can arrange the shadows from the view menu bar.From the
window menu, in shadow we can arrange and change everything about shadow. We
can change the time or where the sun
came.Also with clicking fog I can change the fog settings as well.


We can obtain lots of different scenes for using them while
working. In the window menu say scenes then add scene.In that way for example
one in the right view an done in the top view I can make scenes and use them.

In sketch up the using of the move tool is different from
other programs. When we say move, there is three axis in a different colour.İf
you want to move your cylinder in x axis it says you are in red axis then with
clicking shift you can move your cylinder in red (x) axis.Also with the command
move we can manipulate your object.With clicking face or edge we can make
longer or shorter our object with the command move.We can also rotate our
object with deciding in which axis we want to make our rotation.

If we clicked to an edge or face, with using the right
click, we can find the advanced
selection tools.For example you can select the edges with the same material, or
lines that intersect with the one we choose.

Here we can see the difference between polygons and circle.
In the both, in sketch up we can increase the number of edges but when we made
them 3D when we gave a height, the polygon has lots of faces but the circle has
more perfect face.

The command pushpull help us to extrude lines. The good
thing about pushpull is you can continue to play with the objects.You can use
pushpull again and again in the same place and obtain shapes like a lego.

In sketch up also we can offset the shape we want to inside
or outside. Then we can make presspull again for obtaining this kind of shape.

The other important command is follow me. We can find this
in the tool bar.This helps us to extrude some face in a given direction. İf we
want to make some extrude, but if we don’t
want it in 90 degrees, this command is very useful.

İf we want to soften some edges in houses,we have to click
edge lines, then make right click and say smooth object.You can change the
ratio of smoothness.

Tape measure tool is a very useful tool in sketch up.You can
make lots of things with using this command. You can see the dimensions with
selecting two point, you can change the dimension with writing a number to a
dimension box or you can take references like it happen in the image.

Protractor tool is another useful command in sketch up. With
this command we can create lots of references lines ,deciding the rotation of
them. By that way we can use them in our drawings.It is worked same with the
rotation command. First you decide a axis , then you give an angle.

In the tools menu bar there is section tool. It helps us to
take sections wherever we want to take. You are just clicking the face, and
move it if you want to up or down for taking section .

Dimension tool helps us to write the dimension in our
Project. Again with the right click we can change the text size or colour.

İf we want to move our object as a whole we have to make it
group. Say edit then make group, in that way our object became a group. With
clicking twice we can change the places of our objects inside the group.We can
make changes.

In the window outliner you can arrange the groups you
make.For example you made lots of group without name and its very complicated, here you can give
them names.With making right click, you can arrange the layer of your groups , you
can hide or unhide them.

Click your group and then make right click and say entity
info. Here you can locked some of the groups . In that way you can prevent from moving them.

In the window menu there is component. Here there is lots of
components we can find from the sketchup library. We can drag them quickly to
our sketch up scene.

Again in the window menu, in component options, you can find
all the settings about our components. We can change the height, colour and
size of them. We can change the spacing.

In the window menu,there is material command.There is lots
of different materials for different kind of objects. Just with clicking , you
can add that material to our object.

Also in the material menu there is edit. With using that you
can edit your material, the colour of it. You can make it darker or lighter.

We can import pictures from our desktop with the command
import .Also we can import them as a texture. With making that image became a
material for our object.You can arrange the dimensions of it with the tape measure tool. You can
change the dimension and make whatever you want.

İf we want to put an image as a texture in a complicated shape , we have to
draw a rectangle that shows the volume of our shape. Then put our image in that
rectangle. Then with right click say texture projected. İn the materials menu
choose the imagein a rectangle with the sample paint pencil and apply it to a
complicated shape. Then you will see the it will come proportionally.

In the window menu bar there is styles. Here we can find
lots of different style for our object. It is very useful for presentations.

We can export our skecth up file to a photoshop file.First
with saying export, we have to save our file as a pdf. Then we can export it to
a photoshop foulder.
Sketch Up Pro-Tools and Techniques:

İn the beginning of the course I lerarned the boolean
operations. We can find the boolean tools in the tools menu then solid tools.
We have three kind of boolean operations. They are boolean union, boolean
intersection and boolean difference like we have in rhino as well.

This one is a great example of the boolean intersection from
the two objects I showed in the beginning. Boolean intersection take the
intersection of the two object that is inside of each other and get rid of
them.

The shape in the left one is the example of the boolean
union. İt combined two different object and maket hem one . One that can move and rotate together as a
whole. The shape in the right is example of boolean difference that erased one
object from other.

This shapes are important for showing trim and split. We can
find this commands again the tools menu then solid tools.

This shape show us the command trim. Trim command is same
with the boolean difference but the important thing about that is it isnt get
rid of the two shapes after making boolean difference. İn that way it is
different from boolean difference.

Here we can see the usage of split.Again split is same with
boolean intersect but without deleting it.

Here we used the
command outer shell. We can find this command again in the tools menu bar. This
command helps us to save the outer geometry while using boolean union, but it
deletes the shapes inside of the whole shape that is not useful.
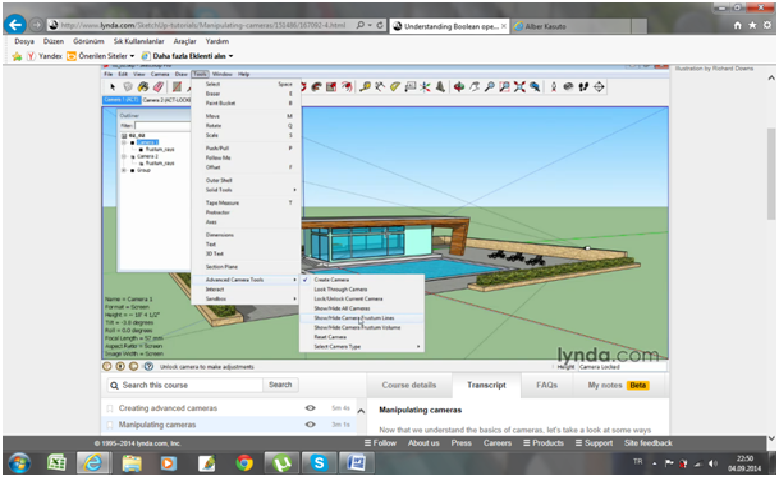
İn sketchup we can find lots of camera tools. First one of
this is in the tools menu bar advanced camera tools then create camera. With
this command you can create a camera everywhere, you can manage the height of
it, the shadow of it. İn advanced camera tools menu the other important command
is frustum lines.İt made lines that show the view of the camera.The other
command frustum volume also made lines that show the volume of the camera.

İf we make right click to camera and say edit camera we can
manage lots of things about camera.The height, the zoom, the name…

İn the draw tool bar,there is sandbox from contours command.
With that we can obtain terrains from contours. İf we have a contour like the
shape in the left one, we can obtain terrains from that like it happen in the
right one.

Another command that help us to obtain terrains is sandbox
from scratch command. As different from the other one, in this first we have to
make our grid.We can manage the number of the grid space.Then with the move
tool we can move the faces and obtain lots of different terrains.For using
other advantages of this tool, we have to open the tool bar of the sandbox from
view then tools. You can say add details, in that way you can increase the
number of control points and make your terrain more controlled. Again with the
command flip edge you can change the orientation of any edge you don’t like it.

From the sandbox
tool we opened before we can
obtain more smooth terrains with the command smoove. It helps us to obtain lots
of terrains like spheres.

Again the sandbox tool there is stamp command. İt helps us
to put the house in a flat, in a grid that is full of terrains.In that way we
can adapt all kind of surfaces to our house with this command. For that reason
it is very useful.

If we have a road, and if we want
to adabt it to our house and surface we can use the command drape from sandbox
tool. First we choose the road then the surface. Then we see that our road come
to our surface like we want. Also from the window tool , soften edges we can
make softer all our surface like it happen in the Picture.

The other important tool we can use in sketch up pro is
component attributes. We can find this from dynamic components with clicking
our component.İn component attributes, you can change whatever you want about
your component.You can also add attributes like price, or size. You can change
the height, the name, the position…With the function menu you can add formulas
and change somethings with using formulas. For example you can change the price
of your sofa by looking the sizes. You can make it with adding functions.

We can also make fences with using the component attribute
tool. We can constrain the value of x and y in the one fence.You can copied the
fence with using this tool without changing the size of the one fence. You can
change the number but not the size. You can arrange everything about that
fence.

İn the tools menu bar there is interact command. With that
command you can open the fridge door, or close.Again we can arrange the setting
of this with using component attributes.You can change the rotation of the
fridge door, you can arrange how big volume you want to use while opening the
door…We don’t have to just open something with the interact tool. İf we say add
attribute and say on click, from the component attributes, I can change the
colour of the fridge for example with clicking to other colours.

The other sketch up
application layout 2014 is very useful for making presentations. We can open a
sketch up Picture in the layout but the best thing about opening a image in
layout is, with making double click, the image became 3D. You can make all
changes and again save it as a image in layout without opening other pages.

İn the layout also we can find all tools and we can draw
whatever we want to draw. We can draw lots of different arcs. Arcs that shows
like circles, or more sharp arcs. With the pie command we can see the degrees .

Also we can find the rectangle commands again in the
layout. If we draw a rectangle,with making up and down,
we can change the sharpness of the edges of my rectangle.İn the rectangle tool
there is rounded and losenge tool.They help to make our rectangle like a
circle.Also in the polygon comment with using up and down we can increase the
number of the sizes.

In the right menu there is stroke.With using the command
fill we can paint the inside of our shapes but it have to be a closed one.

Also we can insert all of the things to layout with using
the command insert. If you click the Picture you insert and make right click,
there is camera tools. From that you can pan or zoom to your Picture.İf you
make a change to your image in 3D for
saving your addings, make right click to image then say updated model
references.In that way you can save the changes you made in 3D to your image.

In the right layer menu there is scrapbox.In scrapbox there
is lots of icons. You can add all icons to your layout.İf you write a text to
your layout, in the up menu there is arrange.You can use being front, being
back commands if you have a image as well in layout.
Hiç yorum yok:
Yorum Gönder